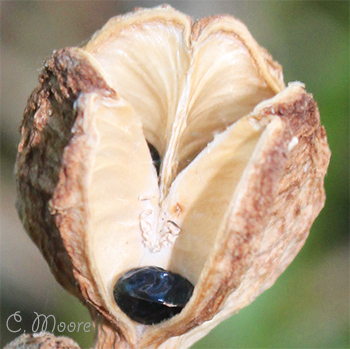
Collecting saving storing daylily seeds from your favourite daylily cross, can be exciting but more rewarding when you eventually see the flower buds appear. By saving seeds this will give you a completely new variety of daylily. You can develop your own seed strains by hand pollinating the daylily flowers that you want by hybridising two flowers together. The stigma is located at the very end of the long single pistol. It sits in amongst the cluster of stamens, coming from the throat of the daylily flower. If the crosses take, it only takes 30 minutes for the pollen to work down the pollen tube and to start producing a seedpod. But you have to have crossed the right daylily varieties together for this to pay off. Once you have crossed the right flowers together you can cover up the flower that you’ve dabbed the pollen on to the stigma, with a small drawstring nylon mesh bag. This serves two purposes –
- To keep other pollinators such as bees and insects off the flowers you have just hybridised.
- If you forget to collect the seeds all the seeds won’t be lost.
It only takes 6 to 8 weeks from pollination to seed saving the seeds. The waiting period is broken up as, 6 weeks for tetraploid daylilies and 8 weeks for diploids. The right timing to collect and harvest daylily seeds is important. Collecting daylily seeds before time can result in a big disaster.
Removing Daylily Seed Pods
Part of caring for daylilies is removing daylily seeds. This is done when the seed pods are fully developed, ripe and plump. This is when the seed case starts to split and the seedpod has gone from green to brown. The daylily seeds are ripe only when you can see the seeds are jet black and not cream or brown. This is when you can start harvesting daylily seeds to store them for future sowing.
Harvesting Daylily Seeds
Open the seedpod when it starts to crack open, this should only be done on a bright sunny day when there has been no rain. Gently pick and squeeze out the black seeds to store them before the birds eat the seeds. Normally there will be from 1 to 20 seeds in the three part seed capsule, this depending on the size of the seed pod and the size of the flower.
Do not store the seeds in plastic bags otherwise, they will sweat and go mouldy.
Use a brown paper bag or a paper envelope to store your seeds.
Storing Daylily Seeds
Make sure your seeds are completely dry before you store them. You may have to spread the seeds out on brown paper, newspaper or paper towel, this may take up to a week to dry them correctly. Otherwise, just put the seeds straight into their envelopes ready for storage. Label the seed packets appropriately and leave the envelopes open for seeds to air dry properly if needed. After this seal the seed packages for storage.
Daylily seeds are best stored for future sowing in the crisper at low temperatures in the refrigerator, to keep the seeds fresh but do not allow the seeds to freeze.

